Showing posts with label organizing. Show all posts

Sunday, February 03, 2008

Finally working on a Layout!

Wow, after a long dry spell, I'm finally working on an actual page!

Blame it on the weather ~ we had a great snowfall, perfect wet packing snow that just begged to be tubed on. We piled on the warm clothes, grabbed the camera, a sled and a tube and off we went!


Photobucket

Photobucket
These are the photos - what a FUN day!

Photobucket

Photobucket

(A perfect day of tubing down snowpacked hills!)

I've also been working on some organizational projects!

See, new magnetic boards for my walls!

I painted, distressed and stained the wood.
The metal is covered with faux suede fabric (the ATG gun works GREAT for this!

Photobucket

Photobucket

I also have figured out something about me ~ I will create something like these wall boards and then as I work on various projects my boards start to get embellished, I add a cool looking monogram here, a few leftover ribbons there, a rubon or two - In a year I'll have to retake photos of these boards and just see :)

Friday, February 01, 2008

Happily Organized!

What a relief!

I am finally back to being organized and post-holiday cleaned up! The before photo was SCARY!

I'm really happy with my new place for flowers and ribbons:

Photobucket

I took some scraps of MME's Signature line and dressed up leftover packaging and jars to bring the look together and give my shelves some continuity. Did you see my big glass fish bowl with all my 'natural' colored fibers & ribbons? I enjoy having odd/different kinds of containers!

I do love my altered book / mini book shelves - it makes my heart happy :) There are just so many cute collected memories here:

Photobucket

So, all in all, the whole wall of shelves is fianlly looking good again:

Photobucket
~That sunflower watercolor is mine too ;)

There has to be something said for how wonderful it feels to have a place for everything and everything in it's place. I can smile again.

Wednesday, January 16, 2008

Digging Out

Okay, I'm ready!

Time to dig myself out of my scrapping slump, get organized again and start CREATING!!

Time me...

I've just snapped the BEFORE photos (don't know if I'll have the courage to actually post them!)

oh, okay, I will...

Photobucket

I've got the music cranked

I've got the dinner cooking and almost ready to serve.

I'm just about ready to sequester myself for a good old cleaning session!

...stay posted

~and soon - cross your fingers - I'll finally have some new work to post :)
____________________

Update:

Although I have not finished the WHOLE room, I did do the hard part - cleaning up the closet :)

Photobucket

It's hard to snap a photo of the whole thing, but it IS straightened up and the countertop is once again available for cutting paper, doing diecuts and working on projects that are require tools, heat or paint.
______________________

Oh, and since you were all so patient - I'll post more of an idea I've been working on for a bit ... a mini clear album:

The cover
Photobucket

Inside pages
Photobucket

Photobucket

Saturday, July 07, 2007

SNAKE!

Just take a look at this little guy! Boy did he give my heart a start yesterday when I opened my car door and almost stepped right on him.

Photo Sharing and Video Hosting at Photobucket

After the initial surprise, and Lexy's immediate question of whether it was a Rattlesnake or not, well, we recovered and got to watch him flick out his tongue in an attempt to figure out what in the world these strange creatures were doing just staring at him! All too soon, he decided it was time to take his leave and depart.

More great news today!

I've got more views of how the studio is coming along:

Photo Sharing and Video Hosting at Photobucket

First, a not-so-good photo of the south wall in the closet. I'm still opening box after box and NOT finding the frame to my scraprack! Until then, I just have the 'guts' (the three ring velcro binders) sitting on top of the dresser. I have to say that I am so EXCITED to see that dresser in there finally! It's got all my alphabets, flowers, ribbons and rubons in it.

Now a photo of my Bookshelf wall - it's still in progress -eek, but I could not resist...

Photo Sharing and Video Hosting at Photobucket

I'm still unpacking craft books, supplies and little collections - oh how I love my little bits. I don't quite know what to call them, but they are my little things I've collected that were just too cute, or novel, or really really cool! Little things like glass dangly things, super mini chairs that are photo holders, silly cows and pigs, wire angels and such. I love being able to have them out and in site once again!

Anyway... back to the shelves themselves...

Theoretically I am to house all my craft books here - ha! I don't think I'll make that happen, too many books. Hmm, you would think I was a librarian or something ;)

I just love all my mini suitcases! Inside there are lots of oft-used supplies ie: The Bling box, Eyelets(the smallest one), Brads, Dymo labeler, 7Gypsies Wax Seals, Office Supply and more. I've had to move my Chipboard and Soldering supplies into life-sized suitcases that are stacked on the floor next to my angel's feet. Good thing I saved my mother's old luggage!

I do have 2 shelves reserved for vacation-themed memorabilia. I just have to make my Hula girl doll to finish off the Hawaii shelf and the other shelf already has my Oregon altered minibook along with framed photos on it.

Now I just have to figure out what in the world will work for the storage of my photos! Ack! Double Ack Ack!! I'm into them so often, I'm adding to and taking out so much. A file cabinet would be heaven-sent, but I don't want (and more importantly don't have room) for one in my room. Got to get the brain working on this puzzle, and soon!

Wednesday, June 20, 2007

My own version of a clipping organizer

Hi everyone!

As part of my organizing I've come across a super easy way to make a do-it-yourself version of this!

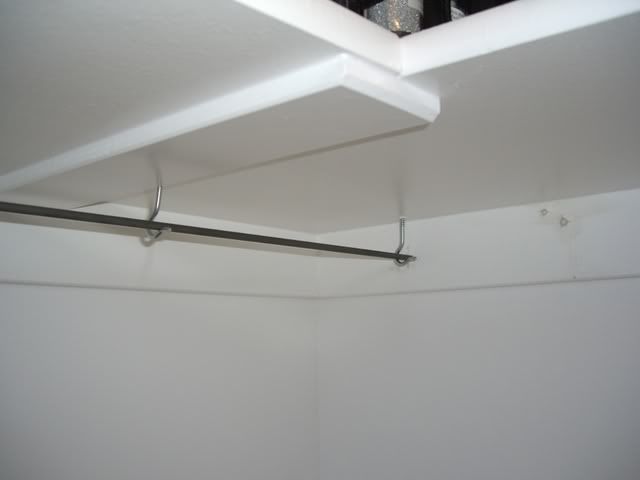
I could not get a photo of the whole thing, sorry. But it's so easy! I've placed it in a 4 ft. section in a walk-in closet, 2" below the shelf and 5" out from the wall.

Photo Sharing and Video Hosting at Photobucket

Supplies:

1/4 metal rod / found a 48" one at Home Depot for under $4.00
Metal Hooks, like super-duty cup hooks / at Home Depot at .99 per bag of 2
Badge Hangers / found at Michaels for under 3.00 per bag of 21 (bead aisle)

Tools:

Measuring Tape & pencil to mark it
Screwdriver to remove clothes rod if you're doing this in a closet with one.
Drill with a 3/32 drill bit (the bit just has to be smaller than your hooks)
Pliers
Rag to clean that rod, oh man, it's got something on it, don't get it next to your clothes when you buy it!

Instructions:

1- Remove the clothes rod from the closet (you can see where I've removed mine, but not painted yet.)

1- Measure your spot. Cut metal rod to fit. If you look really helpless and are super nice to the guys at Home Depot they will take pity on you and they might just cut it for you ;)

2- I pre-drilled the holes before screwing in the hooks, and they still needed a lot of muscle. This is the toughest part, so take heart, when it's done you will be almost there! Oh, and I kind of alternated the final direction of the hooks to add to the rod's stability.

3- Use some big pliers and squeeze the hooks until they hold the rod firmly. This is so you don't lose the rod at a most unopportune (or is it inopportune?) moment - like when it's full.
I would have got eye hooks instead of cup-like hooks if I could have figured out how to put the rod in afterwards.

4- Open those badge hooks from Michaels and start putting them on! I used the pliers again here as I don't care about taking the hooks off again but know I don't want them falling all the time. Just don't squeeze them closed so tight that they don't move along the rod easily.

See - easy, easy!

Photo Sharing and Video Hosting at Photobucket

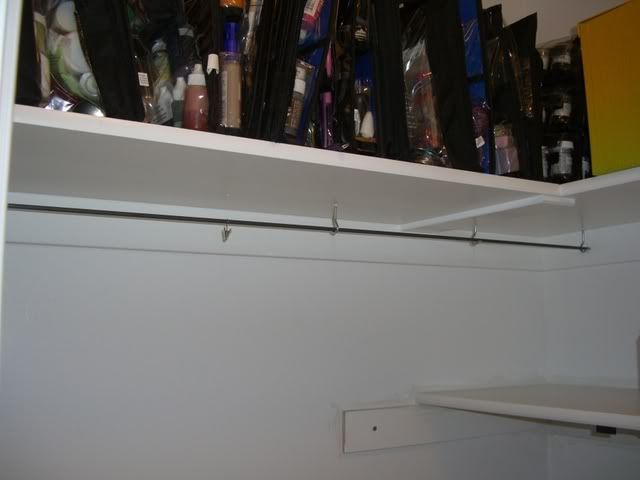
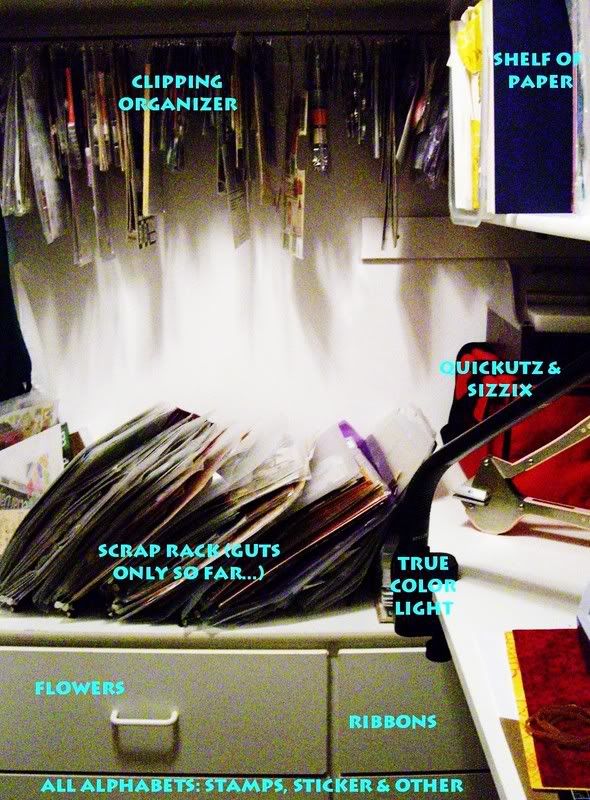
Hey, you see the black organizers up there? Those are what I use to store everything I need for each technique. One bag per technique. It's so easy to just grab what I need when I need it, I even keep the how-to instructions in them. I love this system!

Watch soon I'll be posting photos of the filled up clipping organizer soon, along with photos of the finished supply closet (When I get it done anyway!)

Just ask me if you've got questions!